On the subject of the color scheme of photos of cameras from different manufacturers, there are many opinions and beliefs. You can hear about the fact that one camera manufacturer has better colors than the other. Following this lead, it is believed that in terms of colors and plasticity, one of the manufacturers makes better RAWs than the other, but is this true? In professional applications, consistency counts. In this post, like everyone, you can keep color consistency at a low cost and get the same colors from different cameras that support RAW format.
It will also show you a way to control colors in different lighting conditions. Creating profiles allows not only to get the same colors from different cameras, but also saves us in situations where we mainly take pictures in interiors where there are different light sources with different color temperatures and light spectrum. Thanks to the DCP profile you will control the colors!
Recording of photos on the camera sensor
If we’re talking about RAW files, we’re talking about raw files that don’t really have color information in the way we see them.
A RAW file is a collection of information about the number of photons collected by a black and white matrix which consists of points covered with color filters (red, blue and green) that should filter this color. By which we obtain metadata that sets of three such points, which are then saved as numerical values.
RAW is a numerical notation, not a real photo.
Before a RAW file is created, the camera processor must make calculations that will create a file containing this information in an orderly way and then the camera profile will create only a symbolic preview for us.
Color profiles on the camera
Color profiles in the camera do not matter if you take pictures in RAW, because they only “trigger” a preview of files, but when ripping them to a computer they do not matter much, because there we can change it to a completely different one, without any impact on the file.
If you take photos in JPEG, the settings will be called based on the selected profile.
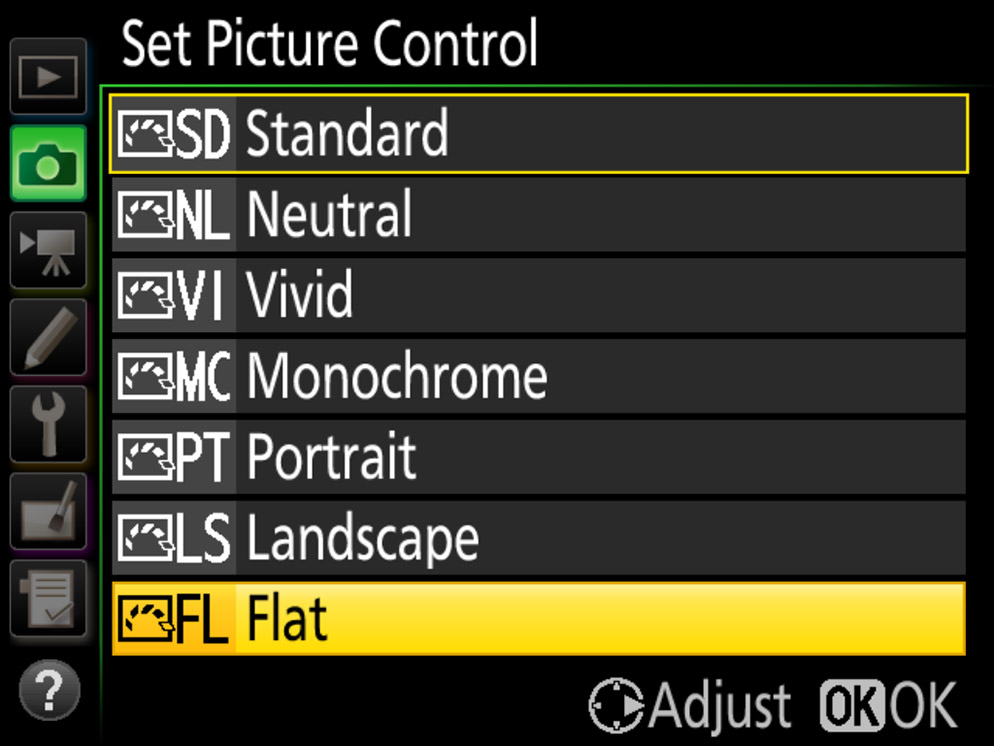
If you have doubts, set the black and white profile in the camera and you will see that in the computer in the photos they will regain colors and that nothing happened to them.
DCP Color Profiles
When we rip RAW files from our camera in Adobe Lightroom, etc. you can see that we have a choice of profiles such as “Camera Standard”, “Adobe Standard” At this point we are at the entrance stage we choose how the software will display the photo from the raw data.

These are built-in DCP profiles that Adobe believes represent camera profiles and may differ from those on the camera. Only the software of manufacturers gives us a faithful reproduction of these profiles. For Nikon, it will be capture NX-D.
Przeznaczona specjalnie do obróbki zdjęć w formacie RAW za pomocą natywnych technologii przetwarzania, które pozwalają w pełni wykorzystać możliwości aparatów Nikon.
The same applies to Canon and other manufacturers who have their own software or profiles created according to Adobe.
Color consistency across multiple cameras
Or maybe its absence results from the fact that the manufacturer himself gives us several options for choosing profiles, there are also different lenses and types of sensors that also affect the reception of photos, and we are not yet with our photos on the computer disk on which we use various programs. So how to achieve color consistency at the end of this process by saving photos, e.g. to a JPEG file?
Profiling with stencils
I will not write here about stencils, of which there are at least a few. For photographers, the most popular, and at the same time the most practical stencil will be the X-Rite ColorChecker Passport. The stencil contains the most important colors found in nature and professional applications. It also has a pocket case, which is also an integral part of it, so you can hide it in your pocket and put it at a 45-degree angle.

Starting from the top, on the stencil we will find such colors as:
- Gray
- CMY (Cyan, Magenta, Yellow) and RGB (Red, Green, Blue) colors, used in the printing process,
- The third and fourth rows are the colors most common in nature, you will find there, among others, colors reflecting the blue of the sky, green leaves, and the last two refer to the colors of the skin.
The stencil can be used once, to create profiles for each camera that we use, or in any situation when we encounter difficult lighting conditions, i.e. an altar in a church where miracles can happen and the light is mixed with three other types of light bulbs. You can also try to profile specific sets of Body + Lens. So we usually have two to four scenarios:
- Universal profile for a given body
- Profile for body + glass set
- Profile in specific lighting conditions
- Profile in specific lighting conditions for a specific set
In difficult situations, we can remove the stencil from the pocket (it should fit) and take a picture of it so that this terribly unpredictable light falls on it. Most of the time, a profile for each body should suffice.
Photographing a stencil
If we want to profile several cameras, it is good to do it at the same time and conditions. If we want to start it from A to Z, it is worth doing it in two different lighting conditions, which will create a Dual Illuminant profile, for less demanding you can make a profile only for daylight with a temperature of approx. 6500k (these are single-Illuminant profiles)
The Dual Illuminant profile consists of images in two different light sources:
- daylight
- Incandescent light
Profile for daylight
The profile for daylight, as the name suggests, should contain daylight with a temperature of 6500k, but you need to remember a few more issues.
- Photos are best taken at noon, when the sun is high
- It should not be with high cloudiness
- They are not made around sunrise and sunset
- The best place is an open space without buildings and other elements that can reflect light.
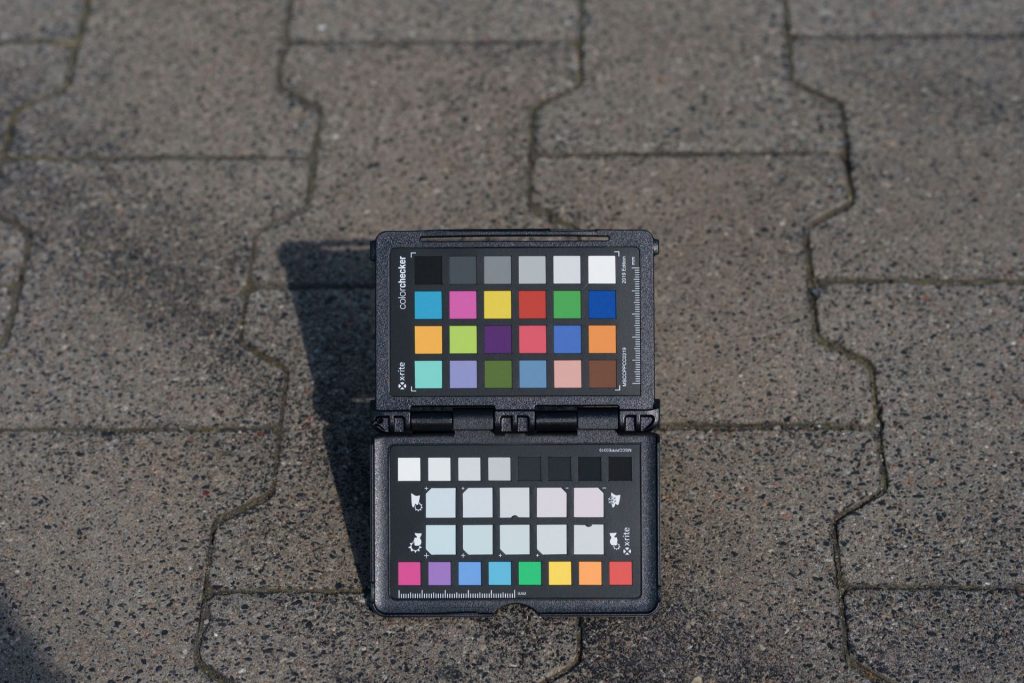
Place and time of shooting
I took my photos of ColorChecker in a large parking lot near shopping malls away from buildings, trees and advertising banners. To be sure, I also dressed in black clothes, so as not to add colors myself.
For the photos you should position yourself so that the sun is slightly behind your back and nothing else reflects / shines towards the board. You also have to be careful not to position the probe relative to the camera in such a way that reflections are created. We care about pure sunlight with a temperature of about 6500K without any dyings. Things to do:
- We set the lowest native ISO
- We set the aperture f.5.6-8
- The photo must be in focus
- We disable all corrections in body vignetting, long exposures, etc.
- Save a regular RAW file (no s-RAW)
- We do not use any filters on lenses
- It is worth taking 3-5 photos with bracketing to choose the best exposia later
All cameras at once
I photographed the sampler from two Nikon D750s, where one is connected with a Sigma Art 35mm 1.4 lens and the other with a Sigma ART 85mm 1.4 lens and in this configuration I work most of the time. I also took pictures with the Olympus M5 Mark II with a 25mm f.1.8 lens as well as an iPhone X through the Adobe Lightroom Mobile application that allows you to save DNG.
Parameters
- On each of the cameras I set the aperture so that there was no vignetting.
- In addition, I used bracketing +/- 0.3 EV to choose the best photo if necessary.
- I framed each photo so that the sampler occupied 1/3 of the frame to avoid distortion and vignette.
- All photos are taken of course in RAW / DNG format
Profile for incandescent light
Here the matter is simple and at the same time difficult in times of ecology. Incandescent light will be obtained only from a bulb that has a filament. They cannot be any halogen versions, LED versions, etc. inventions are also irrelevant to their color temperature. Incandescent light is light created by warming up the so-called. filament that begins to glow. Such bulbs could be found once in every home and usually had about 40-60W of power, and even 100W.

Currently, incandescent bulbs in stores are replaced by their energy-saving counterparts where their LED equivalent with a power of 13W is replaced by a 100W bulb. These bulbs, unfortunately, have a worse light spectrum and are not used for calibration, although they may have a similar color temperature.
How to find a light bulb?
Traditional incandescent bulbs are easiest to look for on the Internet, or in construction stores under the slogan “traditional” or “shockproof” because they can be used in difficult conditions, or portable lamps. They are not intended for home use (usually formally), due to new regulations. One transparent bulb with a power of 60W without any dyeing should suffice.

Where to take pictures?
We shoot similarly to photos in daylight, so that the light falls on the stencil without reflection from the elements of the environment. If we have a place to connect 220V, we can also do it in an empty parking lot, but usually a large room painted in white or black is enough. The fewer colors the better, so here I also recommend black clothes.
To have better control over the light, I used two bulbs that I put on two Chinese tripods for continuous light with an E27 thread in which I could screw the bulbs in and set the lighting evenly so that there were no reflections on the stencil.
Of course, we take pictures from all cameras that we want to “synchronize” in color.
Rip photos
At the stage of ripping photos, it is worth somehow associating files with a given camera body, so as not to confuse something and make them in pairs for each camera.
Nikon 1
- Daylight
- Incandescent light
Olympus
- Daylight
- Incandescent light
Etc.
This can be done in folders and pass photos through DNG Converter, but I recommend ripping photos to Lightroom. Then check the exposure and whether there are any reflections on the stencils and then choose the best photo from the series if you took it with bracketing.
Creating profiles in DNG Profile Editor
DNG Profile Editor is a program from 2012, but its use of the DNG format we can still use its functionality to this day. It gives a little more options than the software included with ColorChecker, including a plugin for LR (I recommend for the lazy).
If we want to create a raw profile, all we need is the X-Rite ColorChecker software that uses the plugin to create and upload our profiles directly to LR. In Adobe DNG Profile Editor, this is a longer process, but it gives you the opportunity to add your own adjustments at the profile level. We can already change the contrast in the profile itself using curves, as well as the shade of colors, brightness or color saturation with HSL sliders as in LR.
Download DNG Profile Editor
DNG Profile Editor will be downloaded from the Adobe website – here.
Import and selection of photos in Lightroom
Once you have all the photos taken, you should rip them to Adobe Lightroom Classic and choose the ones with the best exposure. ColorChecker will also help us in this, which has a row of 8 dyes – 4 light and 4 dark.
By pressing the J key in the Develop module, or by clicking on the triangles in the upper corners of the histogram, we will see overexposed and underexposed fragments of the photo. In this way, we choose the photo that has the most even exposure and we do the same with each subsequent series from the next camera to which we want to create a profile.
It is a good habit to arrange photos in pairs creating folders for each body if we make a Dual Illminant profile. I create such four folders:

- Nikon D750_1
- solar photo
- incandescent photo
- Nikon D750_2
- solar photo
- incandescent photo
- Olympus
- solar photo
- incandescent photo
- iPhone
- solar photo
- incandescent photo
In each of them I leave a file for daylight and for incandescent light.
Export photos to DNG format
We do not change the selected photos, but export them as DNG files, preferably to the same folders. If you convert photos to DNG format when importing to Lightroom and you have arranged them according to this scheme, you do not have to export them additionally.
Adobe DNG Profile Editor
- Open Adobe DNG Profile Editor and from the menu select File -> Open DNG Image …
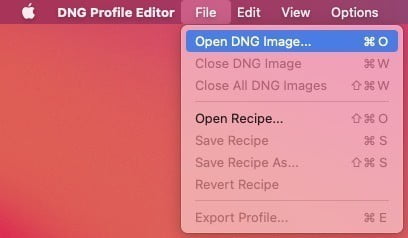
- We choose a photo in daylight
- Go to the Chart tab where 4 dots will appear in the photo (white, black, brown and seledin)
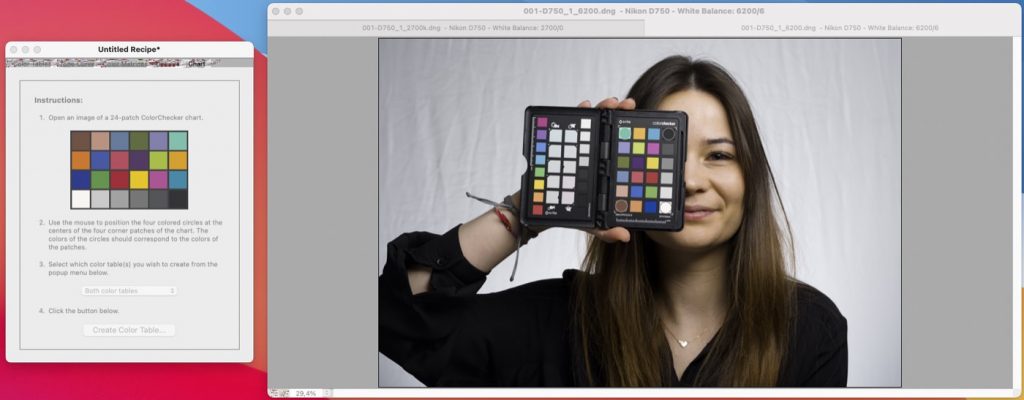
- We set each dot on the corresponding squares in ColorChecker
- In the program window we also have a manual in 4 steps. In the 3rd step, by default, we have the “Both color tables” option selected and if we make a Dual Illuminant profile, we choose the “6500K only” option, and if we do not have a photo with incandescent light, we leave it on both colors.

- We click Create Color Table… and we’re halfway through.
- Once again open File-> Open DNG Image …
- We choose a photo with incandescent light

- Again we mark the points on the stencil
- In step 3 we now select “2860k only”

- Click “Create Color Table…” and it’s almost over.
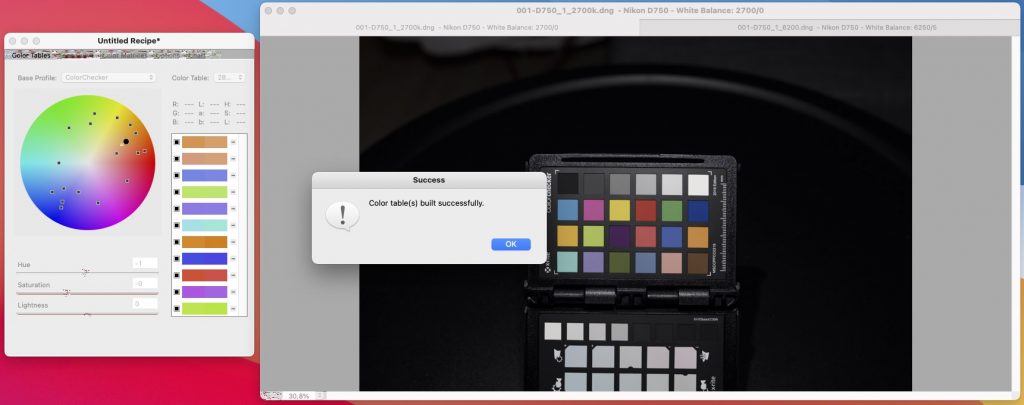
- Select File -> Export Camera DNG Profile in the menu

- We give the name as we want to see in Lightroom and you’re done.
If you have Lightroom open, it should be restarted. Our profile can be found in the Develop module on the right Basic panel in the “Profiles:” list If you do not see it, you have to select it through the “Browse…” option and add it to your favorites by clicking the star next to its name.

If you have any questions or problems, feel free to write in the comment.


This is an incredibly detailed and insightful guide on achieving color consistency across different camera brands! The explanation of RAW files, color profiling, and DCP profiles is especially helpful for photographers looking to maintain uniform colors in their work. The step-by-step approach to creating profiles using ColorChecker and DNG Profile Editor is well-structured. One suggestion could be to include a comparison of results before and after applying these profiles, as visual examples would make it even clearer for readers. Great job on covering such a technical topic in an accessible way!”
This is an incredibly well-explained guide on maintaining color consistency across different cameras! The breakdown of RAW files, color profiling, and DCP profiles is particularly useful for photographers aiming for uniform results. The step-by-step instructions for using ColorChecker and DNG Profile Editor make the process easy to follow. One suggestion would be to add a comparison of images before and after applying these profiles—visual examples could further enhance understanding. Overall, a highly informative and well-structured post!